
THE BEAM FIELD GUIDE
A little guidance.
A lot less guesswork.
Start with your first folder. Learn the rest as you need it.
44 SECONDS · REAL APP
Your first send, step by step.
Connect two devices, send a folder, and find the files that arrive. No sound needed.
Read the steps instead ↓MAKE YOURSELF AT HOME
Find your next step.
Choose a guide to see the real interface and follow along.
Start hereSend your first folderConnect once. Pick a folder. Send it with its structure intact.
Open beam on both devices
Sign in on each device. For your own devices, use the same account. To send to someone else, each person uses their own account.
Connect to the recipient
Open Devices. Show your connection code and have the other person enter it in beam, or enter the code they share with you. Use a fresh code before its countdown expires.
Choose what to send
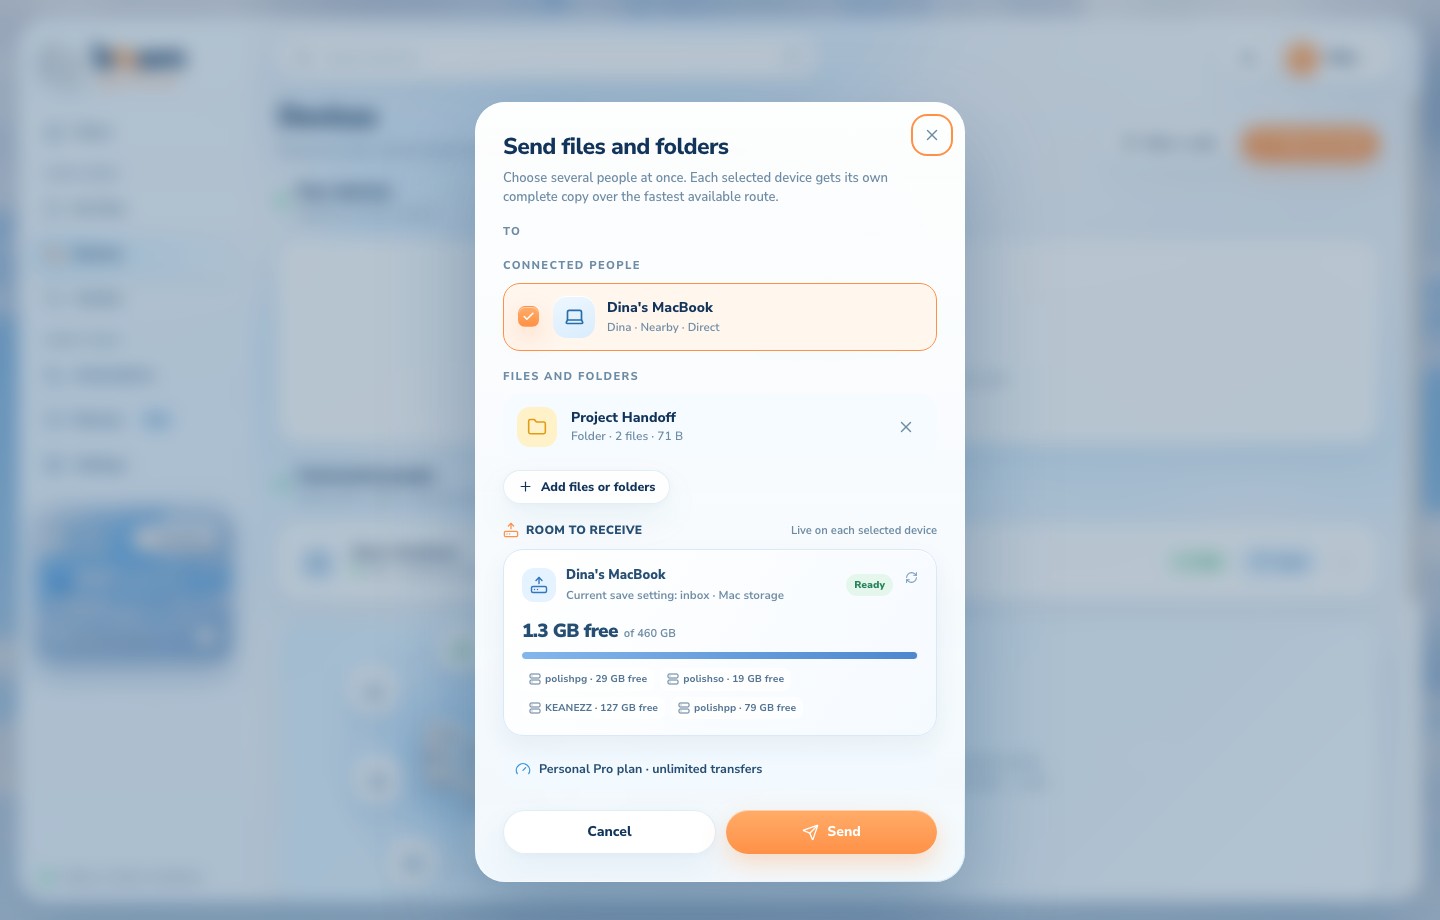
Select Send files and add files or a folder. Choose the destination device. You can select more than one connected device in the same window.
Check, then send
Check the recipient name and available storage, then select Send. The other person accepts the transfer unless they already set Always accept.
Look for Done
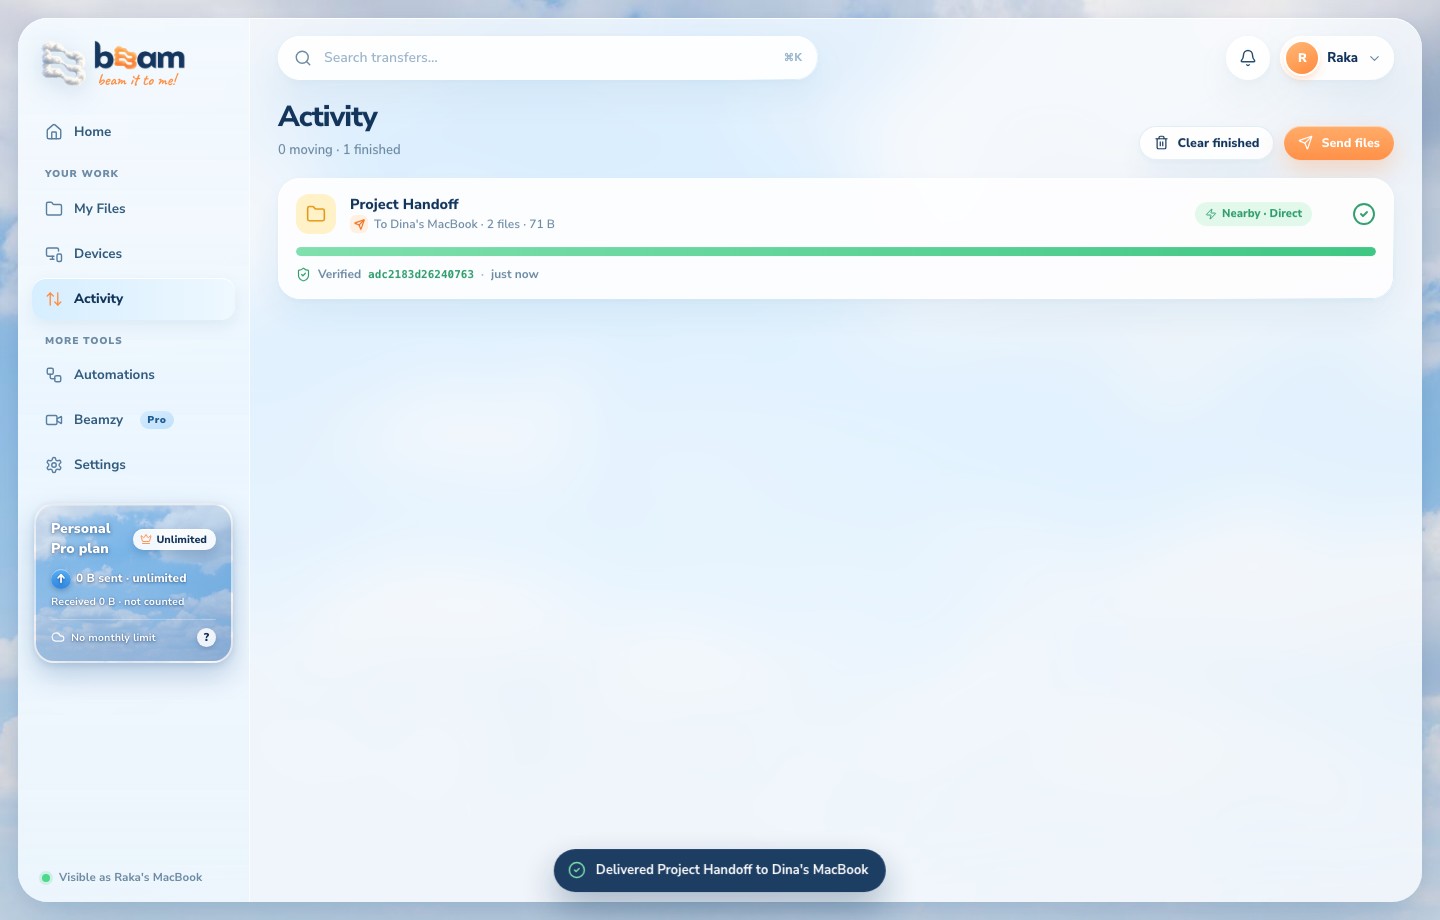
Open Activity to see progress and the destination. Done means the receiver has verified the files. Open the received folder on the receiving device to use them.
Both devices need to be awake with beam running. Beam does not store a delivery in the cloud for an offline recipient.
Start hereReceive files, on any planChoose where files land and who can send without asking.
Connect to the sender
Use Devices and a connection code, or sign in to your own account on both devices.
Check the incoming request
Confirm the sender and the files. Choose a destination folder or an attached drive with enough free space, then accept.
Choose when beam asks
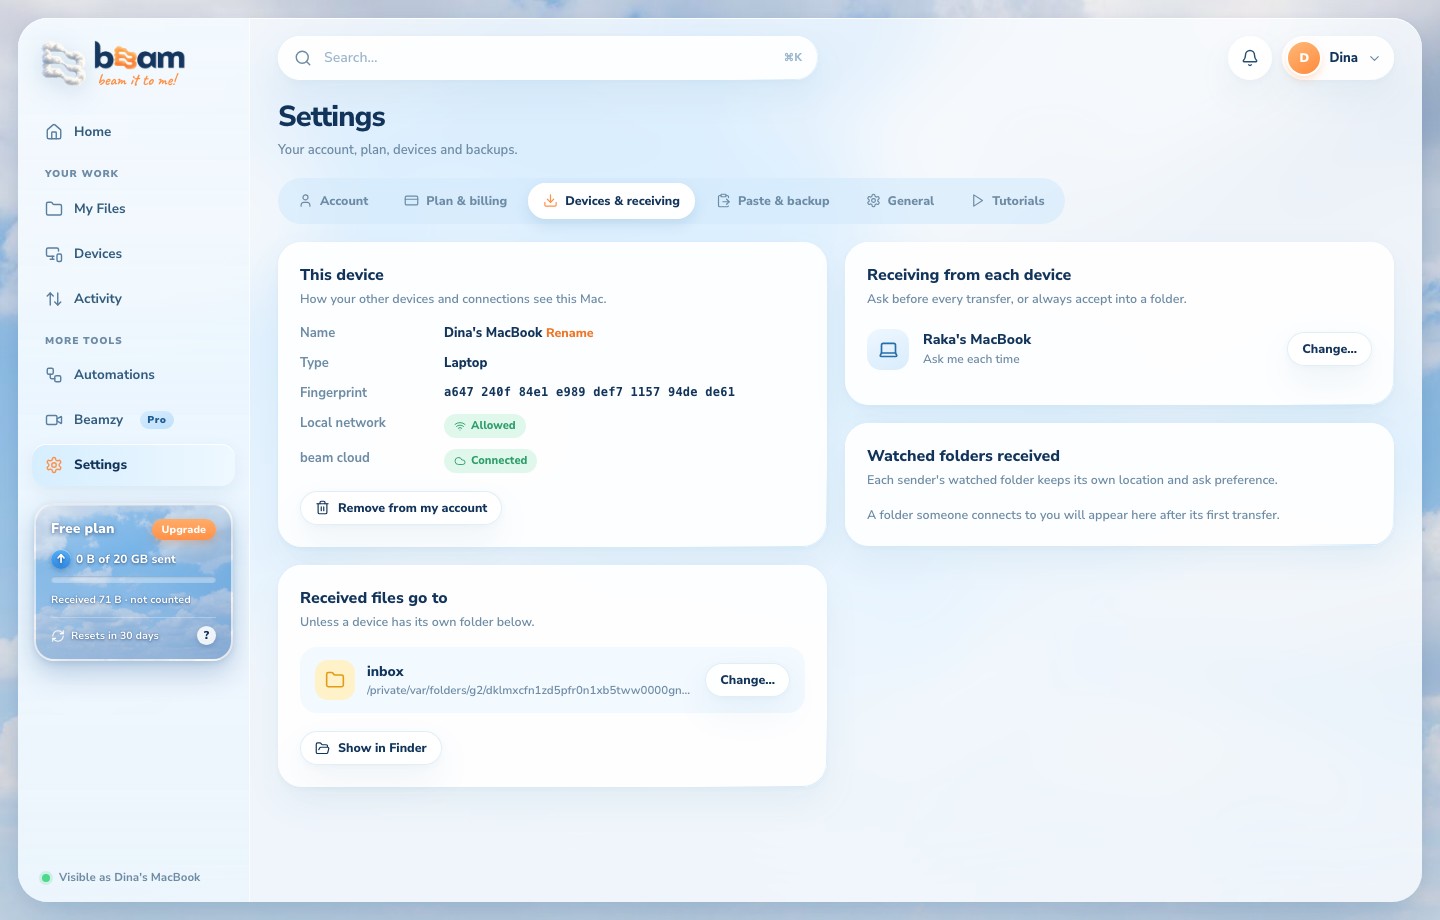
Use Ask me each time for control over every transfer. Only choose Always accept for a device you trust.
Change the default later
Open Settings → Devices & receiving. Change Received files go to, or use Change… beside a device under Receiving from each device.
Find the finished files
Use the completed transfer to open its location. Keep the receiving drive connected until the transfer has finished.
Receiving is free and has no plan quota. Free includes 20 GB of sending per month; Personal includes 200 GB; Personal Pro has unlimited sending. Available disk space still matters.
SendingSend to several peopleOne selection of files, a separate delivery to each device.
Connect each destination
Each person opens beam and connects through Devices. Check names so you choose the intended devices.
Select your files once
Open Send files and add the files or folder.
Select multiple devices
Select each recipient in the destination list, then send. Each device keeps its own receiving permission and folder.
Track each delivery
Activity shows a separate delivery for each recipient. One recipient finishing does not mean the others have finished.
Sending allowance and network work apply to each delivery. Several recipients share your available upload bandwidth.
SendingTrack, pause & continueKnow where a transfer is, without guessing.
Open Activity
Check the file or folder name, device, status and progress. A transfer waiting for acceptance has not started moving files yet.
Check the route
Wi-Fi/direct is a device connection. Relay is the fallback when the devices cannot connect directly. Either route depends on both networks and disks.
Pause when you need to
Use the transfer controls. Resume the paused transfer to continue. Keep the source files and receiving partial files in place.
Retry a stopped transfer
Use Retry on the existing transfer after the connection or disk problem is fixed. Beam reuses valid partial data where possible.
Keep an eye on it from the tray
Click the beam icon in the Mac menu bar or Windows system tray to see ongoing uploads and downloads and the other devices.
Quitting beam or putting a device to sleep stops active delivery. An ETA is an estimate, not a guaranteed finish time.
SendingWhen a receiving drive is fullKeep what arrived. Choose more space. Continue the rest.
Check the storage preview
Before sending, inspect the selected destination’s reported free space. The reading can change while other apps use the drive.
Contact the recipient if needed
Ask them to connect another drive or choose a different receiving folder. You cannot change someone else’s storage for them.
Keep the transfer
If the disk fills, leave the existing transfer and partial files in place. Open its file details to check what finished and what is still waiting.
Change the receiving destination
On the receiving device, select Choose location on the waiting transfer, pick another disk, then select Move received files & continue.
Confirm everything arrived
Check the transfer reaches Done before removing the source files.
Enough free space is required for the remaining files. Beam does not delete your other files to make room.
SendingGet the best transfer speedA short checklist for a slow or waiting transfer.
Read the status first
Waiting for acceptance, offline and paused are different from actively transferring. Resolve that state first.
Keep both devices ready
Keep beam open, prevent sleep during a large transfer, and connect the receiving disk.
Use the strongest connection
For nearby devices, use the same trusted network. Ethernet or a strong Wi-Fi signal can help. Avoid a congested hotspot when possible.
Check both ends
The sender’s upload, the receiver’s download and the slower disk can limit speed. Other uploads, downloads or VPN routes can affect it too.
Share useful details if it stays slow
Record beam versions, transfer size, route, observed speed and the networks on both devices. Never share your password or connection code publicly.
Already connected devices can transfer locally on a reachable LAN without internet. First sign-in, new connections, payment and relay need internet. Offline cloud delivery is not available.
AutomationsLet a folder send for youSend the whole folder once, then new or changed files.
Start with a connected device
Automations require Personal or higher on the sender. The recipient can use Free.
Create an automation
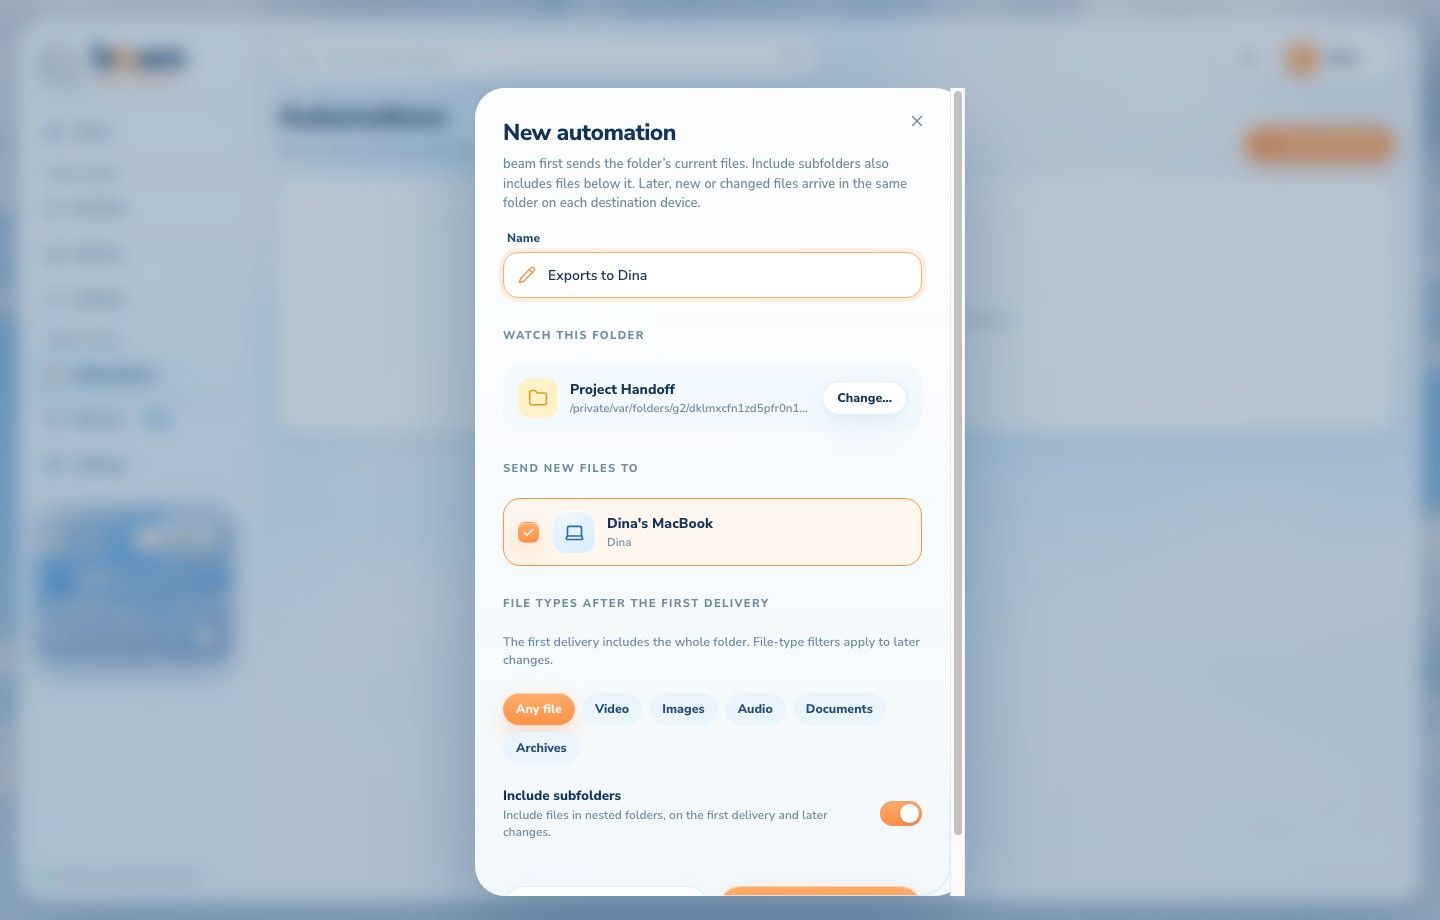
Open Automations → New automation. Name it, choose the watched folder and select one or more destination devices.
Review the first delivery
Creating it sends the folder’s current files. Include subfolders also includes files below it. File-type filters apply only to later changes.
Set the recipient’s folder
For the first incoming watched folder, the recipient chooses where it goes and whether to always save there or ask. Later files keep that folder structure.
Leave beam watching
New or changed files are sent after writing settles. Use Activity to confirm each delivery. Use the automation switch to turn watching off.
This sends file changes; it is not a two-way mirror. Deleting a source file does not delete the recipient’s copy. Files added while manually switched off are not automatically sent when it is switched back on.
AutomationsManage a watched folder you receiveGive each incoming project its own home.
Accept the first folder
Check who it came from and select its save location in the incoming request.
Choose a permission
Always save here lets later changes arrive into that project folder. Always ask keeps you in control of each offer.
Find the saved preference
Open Settings → Devices & receiving → Watched folders received. Each sender’s watched folder has its own entry.
Move or change permission
Use Move… to choose a new location, or switch between Always ask and Save here by default. Keep the old drive connected when moving existing data.
Your per-folder choice is separate from the default receiving folder. The sender still needs to be online while the files transfer.
Backup & reviewBack up to Google Drive or a folderKeep another copy using the destination you choose.
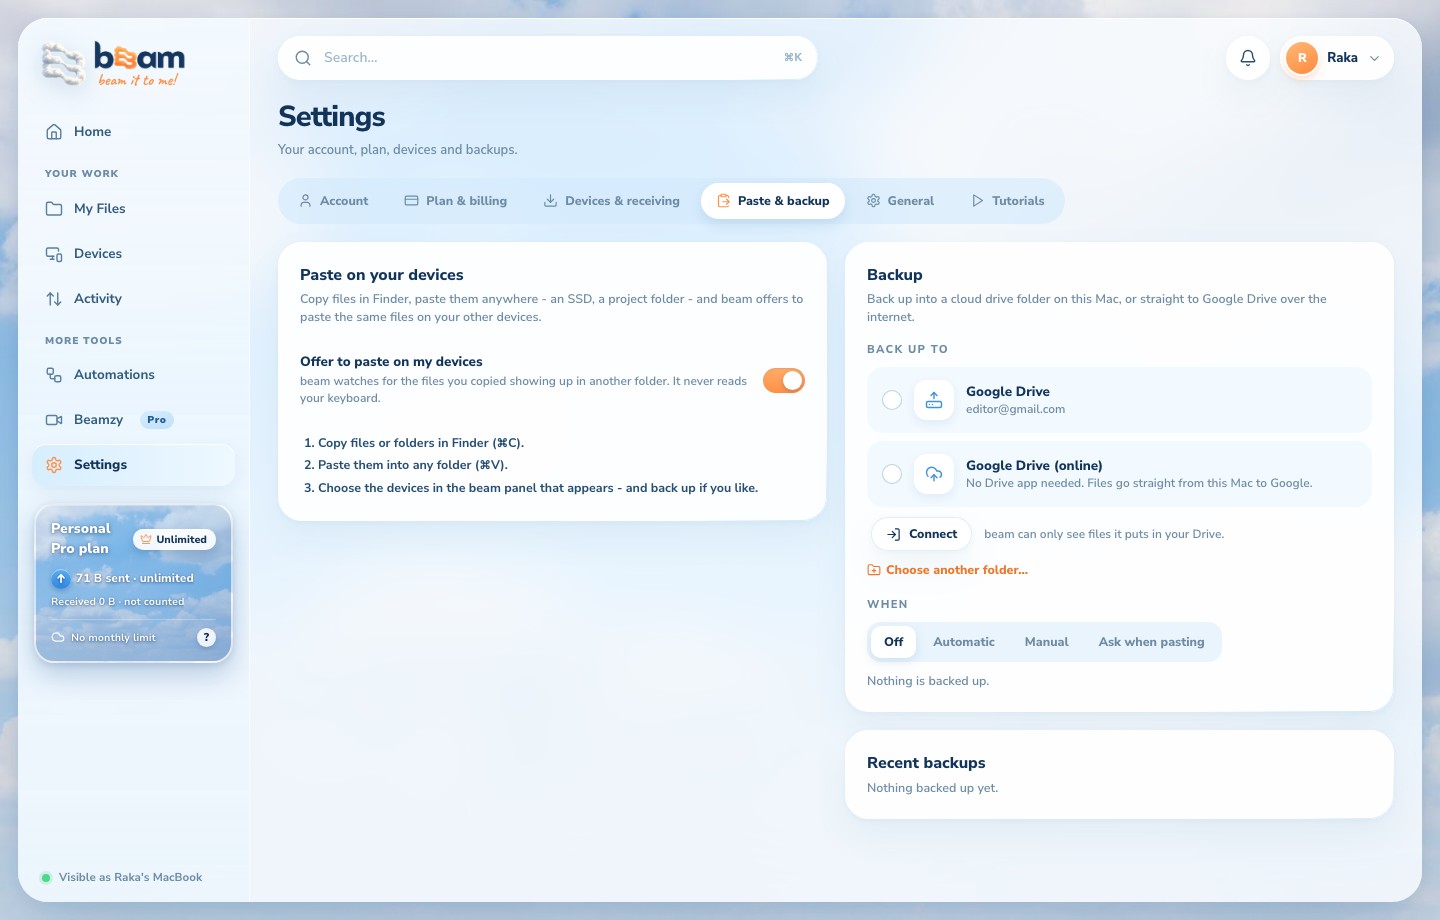
Open backup settings
Go to Settings → Paste & backup. Backup requires Personal or higher.
Choose the destination
Choose a local folder kept in sync by your cloud drive app, another folder, or Google Drive (online) when available.
Connect Google if using online backup
Use Connect and complete Google’s permission screen. Check the Google account before allowing access.
Choose the backup mode
Select Automatic, Manual, Ask when pasting, or Off. Confirm the intended folder and mode before using it.
Check backup progress
Review queued, completed and failed jobs in the backup section. For a local synced folder, the cloud drive app handles the later upload.
Device-to-device transfers and Google Drive backups are different jobs. A local copy into a synced folder is not proof that Google has finished uploading it.
Backup & reviewShare a video for reviewOne review link, comments and a clearer next cut.
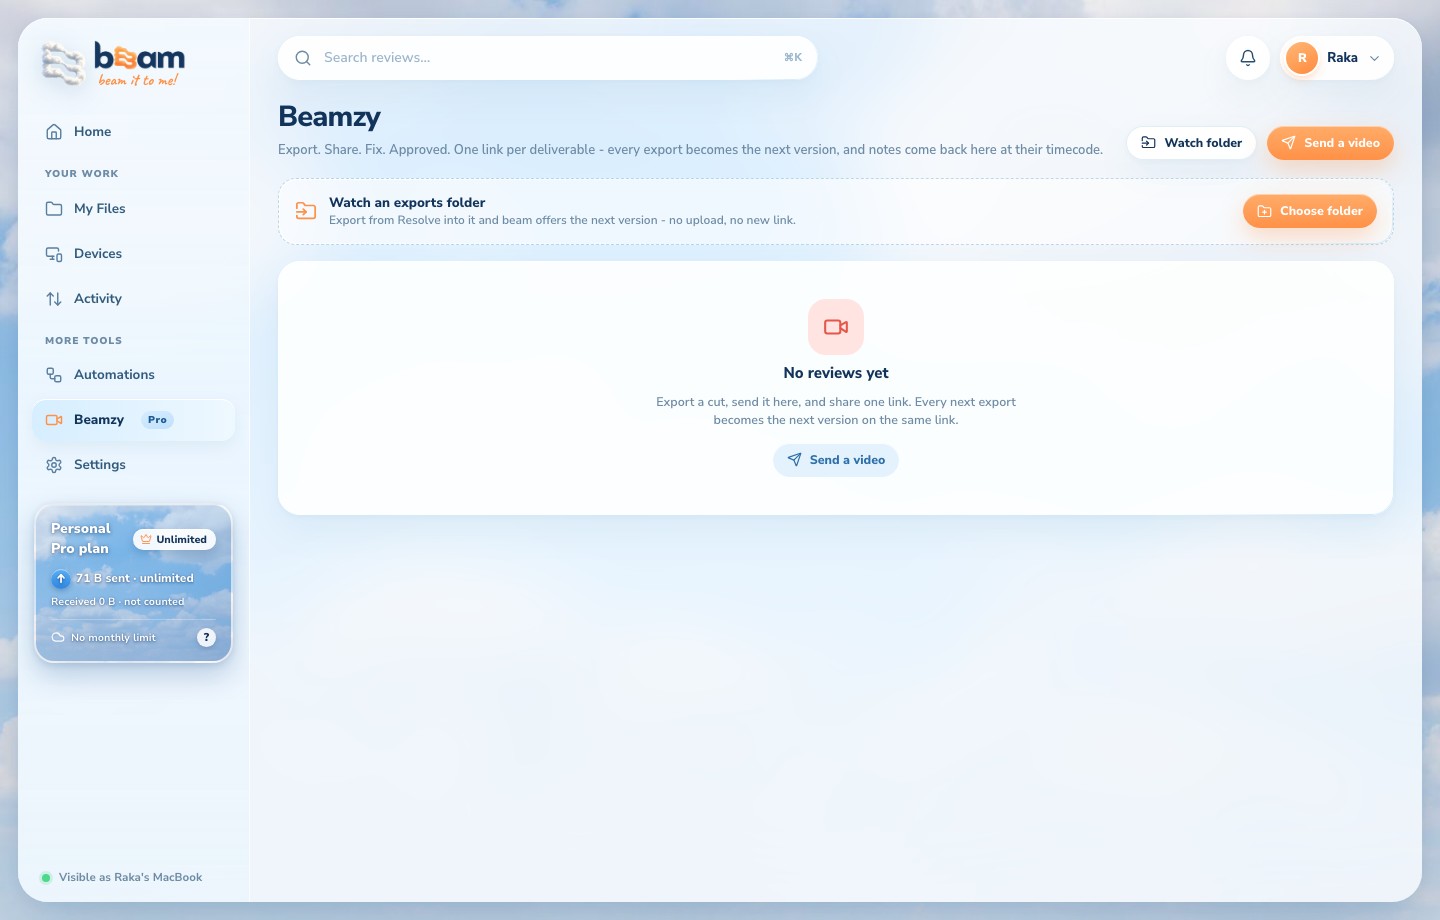
Open Beamzy
Personal Pro or Team is required on the account creating the review. Free and Personal show the upgrade card.
Choose the video
Use Send a video, choose your exported video and give the review a clear title or project.
Wait for the review to be ready
Keep beam open while the review prepares and uploads. Check its status before sharing.
Share the review link
Give the link to your reviewer. They can open the review and leave time-based feedback.
Bring the next cut back
Keep versions together in the project so feedback is easier to follow. A watch folder can help with repeated exports.
Only share review links with the intended people. Review publishing needs internet and is separate from sending the original file to a device.
Account & safetyPlans, payment & vouchersCheck the price and status before you subscribe.
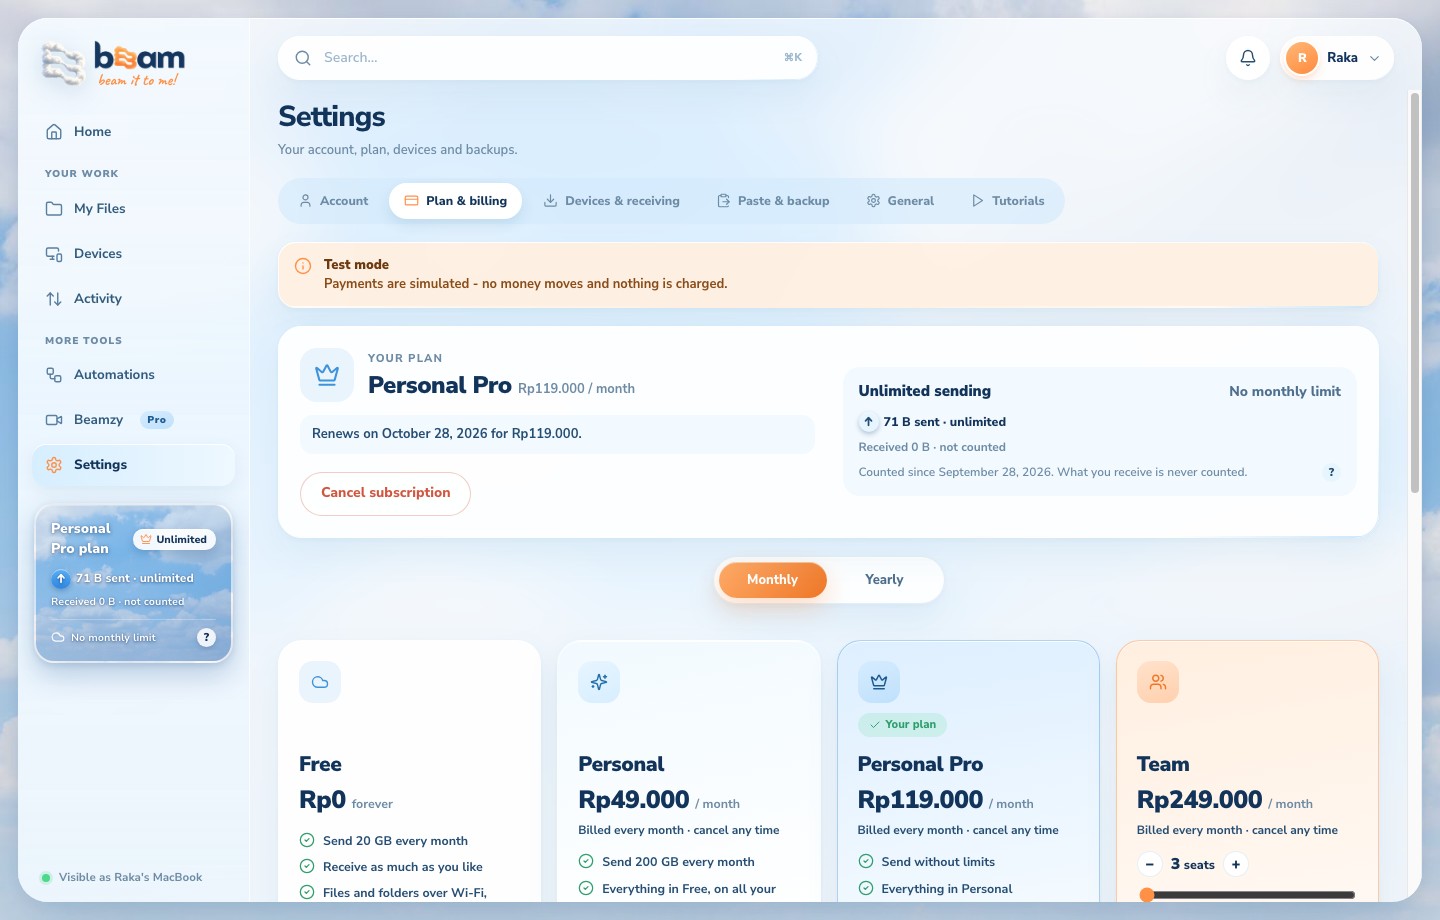
Open your plan
Go to Settings → Plan & billing. Choose monthly or yearly and review the displayed total.
Apply a voucher first
Enter your code below the plan cards and redeem it. Eligible discounts appear on the matching plan; a free-plan voucher applies its stated access and duration.
Review the checkout
Choose the plan and check the amount and period shown before paying. Team owners also choose the seat count.
Complete payment
Choose an available bank or QRIS method in the checkout panel. Follow the payment instructions and wait for beam to confirm.
Verify the result
Return to Plan & billing to check your current plan and invoice. If payment is still confirming, check again before making a second payment.
Never share payment credentials, OTPs or voucher codes publicly. A failed or cancelled checkout does not mean a bank payment was refunded; keep the invoice number if you need help.
Account & safetyJoin or manage a teamOne team plan, individual accounts for each person.
Choose the owner
The owner subscribes to Team and manages the seats and billing. Members use their own accounts.
Share an invitation privately
The owner creates an invitation from the Team settings and shares it with the intended member.
Join from your account
Members open Settings → Account → Join with an invite and paste the invitation.
Check membership
After joining, the Team section appears and the account uses the team’s plan. Only the owner changes team billing.
Connect the devices you use
A team membership does not replace the device receiving choices. Connect the devices and choose receiving permissions deliberately.
Team settings appear only while you are on a Team plan. Leaving the team changes your plan access; it does not remove copies of files already received.
Everyday useFind files & paste across devicesMake the next handoff easier to repeat.
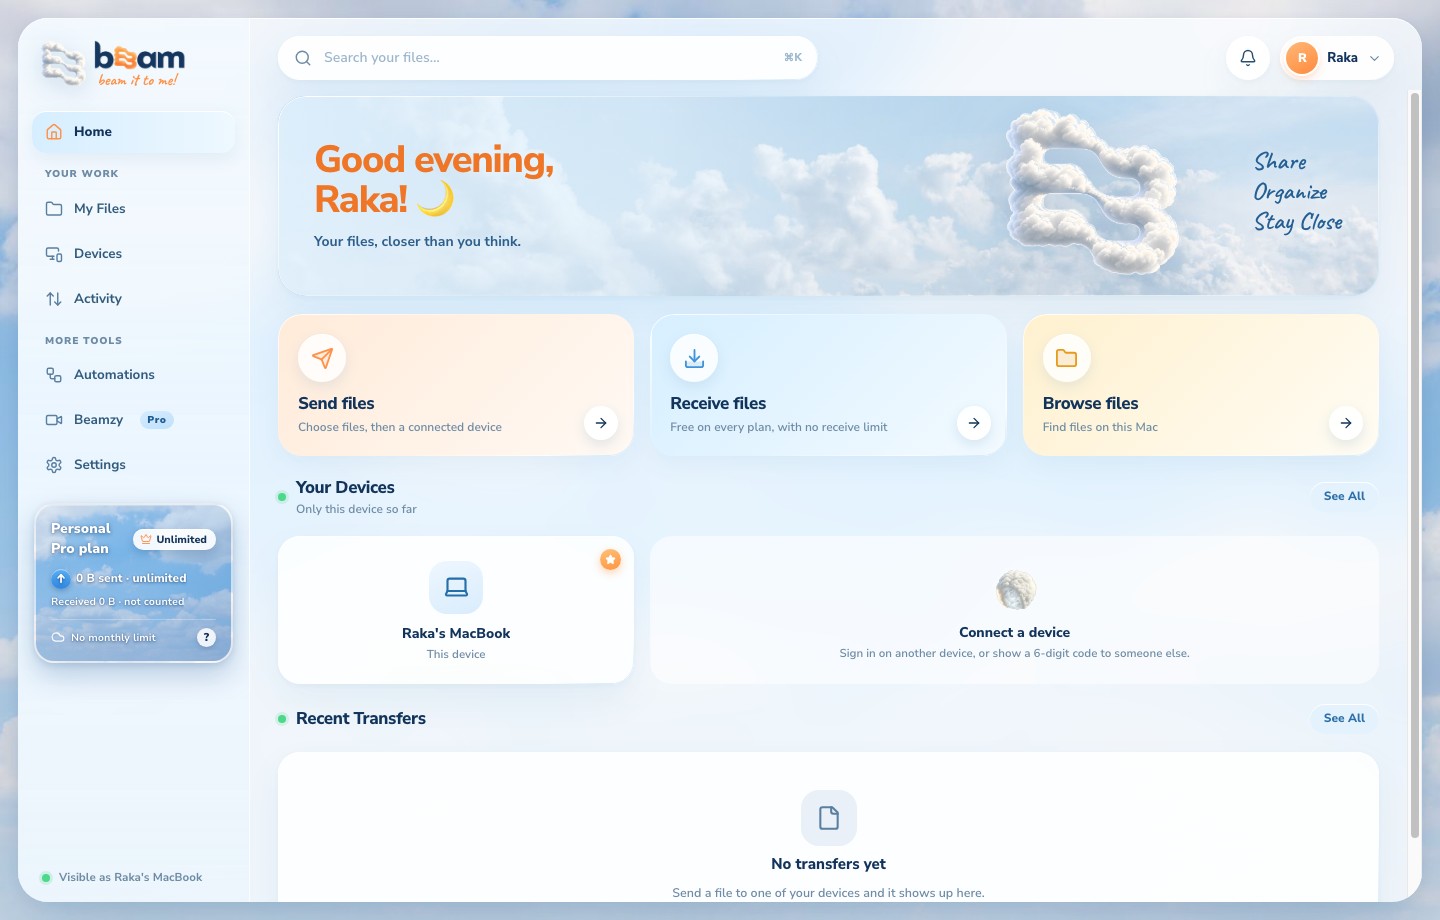
Start from Home
Use Send files for a handoff or open a recent transfer to find its destination.
Browse your files
Use My Files to choose items or folders. Pin locations you use often to find them again.
Use paste suggestions where supported
In Settings → Paste & backup, enable Offer to paste on my devices. Copy and paste files in Finder or Explorer, then use the beam panel when it appears.
Choose where the copy goes
Select the device in the suggestion. Its receiving permissions still apply.
Keep originals until verified
Check the received copy and completed transfer before deleting a source.
Beam copies files. It does not provide a permanent cloud archive of everything you send.
Account & safetyKeep your connections safeA few habits that protect files and accounts.
Check the device name
Before connecting or sending, confirm the person and device through a channel you trust. Connection codes are private and expire.
Use Ask for unfamiliar devices
Only turn on Always accept for devices you trust. Review those permissions in Devices & receiving.
Stop trusting a lost device
Use Devices to forget it, and review your account sessions if a device is lost or shared.
Keep beam current
Use Settings → General to check for updates. Use the official installer and check the installed version on both devices.
Protect your account
Use a unique password or your trusted Google sign-in. Do not share login codes, payment codes or private review links.
Files are encrypted in transit and verified on receipt. A trusted sender can still send an unsafe file; only open files you expect.
Recorded in beam 1.4.18. Labels can vary slightly between Mac and Windows.